Easter happened last week. Did you hear the good good word of chocolate and tender baby sheep meat? As Ms. Eliza Steele so cleverly put it, “Looks to me like a damn good reason to resurrect your ass out of a cave”. Indeed. In other news, hell awaits us!
Any holiday in my family merits dinner rolls, but we won’t settle for any ole run of the mill mini-breads. Hell no. We hail from the fruitful plains of Oklahoma, where low-carb diets do not exist, and wheat bread is for the weak. You know what’s cool? In order to embody this spirit, my mom and dad got all my folks together and made a bunch of us grandkids a cookbook full of family recipes. Things like my uncles fried chicken are sill woefully beyond my capabilities, but I’m slowly breaking in some of the other recipes.

Which, of course, brings us to Ice Box Rolls, a recipe coming straight to your faces from my great grandmother Ward. Do you want to know why they are called ice box rolls? Because they’re rolls that require refrigeration, BUT THIS FUCKING RECIPE WAS INVENTED BEFORE THE REFRIGERATOR. That’s right, jerks. The dough would be chilled overnight in a goddamn insulated box with a bigass ice block in it, for fucks sake. You’d have to get ice delivered (which, let’s be honest, is a feat in itself. I’ve actually read up a bit about it, but that’s another story for another time… or not). Regardless, my great grandmother was badass. She raised a kid during the depression, in the heart of the dustbowl, with a goddamn icebox. What the fuck have you done lately?

Here’s the best thing about these rolls: They’re forgiving. My mom, who usually makes these, confided in me that because they rise overnight and she has to make the dough right before bed, she makes mistakes all the time. Just about as many ways as you could imagine to mess this up, she’s done it, and they still come out perfect every single time. If you read below you’ll be delighted to find that I discovered a whole NEW way to fuck these puppies up, and they WERE STILL EXCELLENT. Just don’t kill the yeast, but I’ll touch on that later.
Ice Box Rolls
Passed down from my great grandmother Ward, overall badass queen b
- 4 1/2 cups flour
- 1 tsp salt
- 1 tsp soda (that means baking soda – how old timey is THAT SHIT)
- 1/4 cup sugar
- 1/2 cup shortening (crisco, basically, but your can use straight-up lard if you know what the fuck is up)
- 2 cups buttermilk (you can make your own buttermilk with regular milk and either lemon juice or white vinegar, see below)
- 1 package Fleischmann’s yeast (or whatever kind. One little envelope’s worth)
- Preheat oven between 400-425 degrees. (A fucking window of temperatures?! Jesus. We usually do it at 425)
- Mix flour, salt, soda, and sugar together.
- Cut in shortening.
- Heat 1 cup buttermilk to warm only (see my notes below, this is critical). Dissolve yeast in the warm buttermilk. Add other cup of buttermilk to it, then mix with dry ingredients.
- Cover and let stand in refrigerator over night.
- Let rise 2 hours after rolling out.
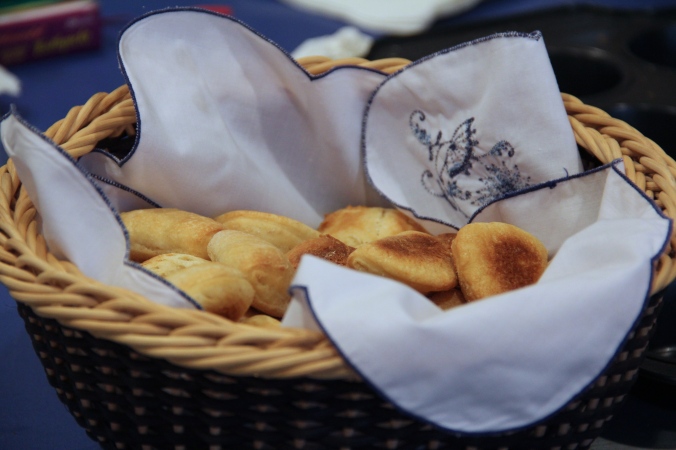
- Cook on greased pan. Makes 35 large cloverleaf rolls or 60 medium Parker House rolls.
Necessary equipment: either 2-3 muffin tins, or a rolling pin, a round cookie cutter, and as many cookie sheets as you can find.
THE RUNDOWN:
1. Gawk.
Did you see that shit? Did you see that damn recipe? Straight from the horses mouth (except for my mom’s handwriting and use of the word “refrigerator”, as well as my notes in parentheses, which obviously did not come from a woman born at the turn of the century). You’ll notice it’s vague as hell; thank god for me, right? (Again, hell awaits us).
HOLY FUCK LET’S GET DIRTAY.
2. Lay out the ingredients.

Get ’em out. Get ’em ready. Not a whole lot going on, just your standard bread fare. You’ll notice something about my picture if you look: no buttermilk. I hate buying buttermilk, because it’s always more than I need for the recipe and so I don’t use it all and it spoils. So instead, I make my own by essentially curdling regular milk, which I’ll get into in a bit. Because the dough has to rise for at least 8 hours, you should probably plan on making it the night before whenever you’re going to need the rolls.
3. Mix together dry ingredients.

Pretty straightforward stuff. Forgive my photo(s), it’s hard to get a shot into a bowl when you’re only 5’4”, but that seems like most of what I end up trying to take pictures of.
4. Make the “buttermilk”.
Now, if you read little house on the prairie, or if you generally ponder dairy products (guilty on both counts over here), you know that buttermilk traditionally is the milk leftover in the churner after making butter. But it’s come to mean a whole different thing in most of the world where warm temperatures make milk spoil quickly; in those locations, it’s a fermented milk that tastes sour due to lactic acid bacteria, genera Lactococcus or Lactobacillus (ohmygod nobody cares EMMA, SHUT UP). We use it in baking because the acidic nature of buttermilk tenderizes the gluten, creating fluffy baked goods. Fuck yes to that.
So, if you buy buttermilk, skip this step. If you just want to make it, pour two tablespoons of either white vinegar (that’s what I used) or lemon juice into a measuring cup and fill it up the rest of the way to the two-cup mark with milk. Whole is better, but use what you got. Give it a stir and let it sit about 10 minutes – it will curdle up and be exactly what you need.


5. Cut in the shortening.
While the buttermilk curdles up, cut the shortening into the flour. What you’re trying to essentially do is mix the shortening into the dry ingrdients without homogenizing the whole thing – you still want pea-sized bits on shortening left so that they make the rolls nice and flaky when they cook. You can do this by either using knives to slice at the shortening blobs in the flour like a fucking caveman, or you can use a pastry cutter, which is essentially like brass knuckles for bread-related purposes. Google it. I don’t have a pastry cutter and I’m proper goddamn lady, so I used my perfect, lovely, excellent mini food processor for this – it gets the job done just fine!

Since it’s small I put in about half the dry ingredients, plus half of the crisco (1/4 cup), ran it until there were little pea-sized lumps, and then did the other half with the other 1/4 cup crisco, and added them together in the bowl. My mom used real lard (pig fat) instead of crisco for the first time last weekend, and she said the OKC crowd were big fans. Shocker there.

6. Warm one cup of the buttermilk.
This part is essentially the only part you aren’t allowed to fuck up. The yeast is basically comprised of little dry sea monkies that need to be revived with liquid, food, and warmth, and if we give them too much heat, they will literally die. So don’t do that. Put a cup of the buttermilk into a pan and slowly and carefully heat it – don’t scald the milk, not even close. Pretend you’re getting milk ready for a little baby human – AS SOON AS it feels warm to the touch, it’s warm enough. Anything that feels like it’s hot enough to be bath water or hot chocolate is way too hot for the yeast.

Turn the heat off immediately and add the entire packet of yeast to the pot. Stir until dissolved. Then add in the other cup of buttermilk.

There are still a few clumps in there, I know. Shut your hole.
7. Combine all ingredients.
Add the buttermilk/yeast combo to the flour mixture. You can use a mixer to stir until just combined, or you can be a prairie goddess and stir it with your hands. No kneading required; just make sure it’s all mixed. Don’t overmix it or the bread won’t be as soft and fluffy.


Now that you’ve successfully not fucked things up too bad, it’s time to prep the rolls for baking. There are two ways to do this.

Flour the work surface generously and roll out the dough. Sprinkle a little flour on top of the dough before you roll to keep the rolling pin from sticking, unless you have a sweet marble rolling pin because you’re at your aunt and uncle’s house and they have nice things.


Roll it until it’s just a touch less than 1/4 inch thick. Then, take your biscuit cutter or cookie cutter that’s about 3 inches wide (my mom just uses a water glass), and cut out little circles. Put them on a greased baking sheet with room to expand, and fold them in half. They will look shrimpy but looks can be deceiving.


Once the dough you rolled out has no more space for additional circles, roll it back into a ball and then back into a flat again, and repeat the cutting out and folding. Continue until there’s no dough left!

Now. If that seems like a lot of work, it’s really not – it took me about 10 minutes to do half the dough. However, it is a pain in the butt to clean up and requires a rolling pin and counter space. So here, I interject a second method that I tried (I’m a loose cannon, what can I say), which I should note is STILL authentic because it is in the original recipe: The cloverleaf roll. What is that? Well, I’ll tell you.
2) Cloverleaf-style roll. This is super easy. Flour up your hands, and grab a bit of dough – just enough to make a small ball about 1 inch in diameter. Roll it up and put it into a greased muffin pan. Repeat twice more, for a total of three balls. Put them all in the same cup, making a sort of triangle at the bottom – the three together should just fit inside the cup, all touching each other.
Repeat for the rest of the muffin pan.

Nothing too hot, but a warm kitchen is good, or a gas oven that’s off, as I so astutely noticed. Cover the rolls with a towel while they rise so they don’t dry out.

As we usually cook the rolls last, right before we eat, the oven is usually already hot. Just make sure it’s at the right temperature.
This is optional, really. It’s not in the original recipe at all, but everyone in my family who makes these always does it. Why wouldn’t you? Well, if you’re me, you’re hungry and don’t have a pastry brush. So I didn’t. But I mean, you really should.
This time can vary. Smaller parker house rolls take 10-15 minutes, and the cloverleaf rolls took about 20-25 as they’re bigger. We generally start eating and the first rolls are out about 10 minutes into dinner – just make sure you set a timer so you don’t forget about the rolls!


You should format these posts on Imgur, leave a tasteful link to your blog at the end, and post them to /r/food if you’re looking for a bigger audience.
LikeLiked by 1 person
That’s an excellent idea, thanks, Mr. President! I’ll do that when I have a moment. Thanks so much for taking time from leading the free world to read my blog :3
LikeLike
Awesome post, as usual. Just had to chime in that as someone who has made these rolls SO MANY GODDAMN TIMES, I take exception to two small points:
1) “you can murder the everloving daylights out of this recipe and you’ll pull through”– lololololololol tell that to Boulton Xmas of ’05, ’06, ’08, ’10, and ’11. Maybe I’m just very gifted at fucking up unfuckupable recipes.
2) Ahem excuse me, where is my family cookbook? Please tell your parents that that thing looks awesome and I want one please and thank you.
LikeLiked by 1 person
Ahh oh no! Maybe the rolls know when they’re outside of Oklahoma boarders and revolt. Do you have any tips that I could add based on those experiences?
Also, I’ll look into the cookbook thing! This one was for my dad’s side of the family, so my mom’s additions were the only Boulton ones. I’ll see if we can make one for you and Liz and me (Let’s be real – Tom and Will won’t ever use one).
LikeLike
I’d like to let my dough rise in your warm place for a couple of hours, know what I mean?
LikeLike
Pingback: BRUCE BOGTROTTER’S CHOCOLATE CAKE | emma talks about food